Pages

Monday, November 29, 2010

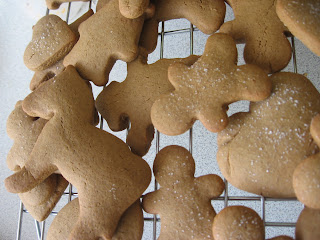
Gingerbread #2

I've been thinking about making a (my first) gingerbread house this Christmas so have been wanting to try another recipe to see whether it is any better than this one. I was after something more spicy.

When I was younger there was a lovely little shop (that sadly closed) down the road that sold the most perfect, spicy, firm gingerbread cookies and I've been wanting to recreate them ever since. This recipe includes ground black pepper and a greater percentage of all the other spices so it is definitely promising!


Gingerbread Man Cookies from 101 Cookbooks

My version - halved

2 C plain flour
1.5/4 (3/8) tsp bicarb soda
1/2 tsp salt
2 tsp ground ginger
1/2 tsp ground cloves
1/2 tbsp ground cinnamon
1/4 tsp ground black pepper


75g unsalted butter, at room temperature
1/3 C brown sugar, firmly packed

1 1/2 large eggs (2 small eggs would be fine)
1/3 C molasses


 Method

1. In a medium bowl, sift together flour, baking soda, salt and spices. Set aside.


2. In a large bowl by hand (or with an electric mixer) cream the butter until it is light and fluffy. 

3. Add the sugar and mix again until light and creamy. 

4. Blend in the eggs one at a time and then the molasses. 


5. Add the flour mixture in two additions either by hand or on low speed. 

6. Divide the dough into two pieces, wrap each in plastic and chill for an hour or so (as this is half the original recipe I didn't bother dividing it into two).

7. Heat oven to 160C fan-forced, place the racks in the middle, and line a couple baking sheets with baking paper. Set aside.

8. Roll the dough out onto a lightly floured countertop to roughly 1cm thick (I prefer mine closer to 0.5cm as they rise a bit and was after a firmer cookie this time, although soft gingerbread is lovely too) and cut into gingerbread men (or other desired shapes). 


What a mess!

 9. Transfer to baking sheets. Sprinkle with granulated sugar (optional) and bake for 7 -10 minutes (for 3-4-inch cookies), less for smaller cookies, more for larger.

10. Cool on tray for 5 minutes then transfer to a wire rack to cool completely. Store in airtight container.


- It's important not to over-bake these as they will dry out.
- The original recipe used whole wheat flour, unsulphured blackstrap molasses and dark natural cane sugar.
- This halved recipe made30-40 biscuits!

Verdict
Spicy! Finally. The first tray I made were a bit too soft (for my liking) so left the second and third trays in for 8-9mins rather than 7.


Will be making caramel slices again later this week to give to a friend as part of her birthday pressie. Might try a few things differently so will post about it if I get the chance.

Friday, November 26, 2010

Shortbread

Let the celebaking begin! Exams are all done and I've been busy celebrating with friends and finally doing some shopping etc etc and of course baking.

I've never made shortbread before so wanted to give it a shot seeing as Christmas is fast approaching. It's a pretty festive biscuit so might make a nice gift if I can find a perfect recipe.


Classic Shortbread from Bake It


My version


Ingredients
225g butter, softened to room temperature
115g (1/2 C) caster sugar, plus extra for dusting
225g (1 3/4 C) plain flour
115g (2/3 C) rice flour
pinch of salt
dash of vanilla essence (not in original recipe)


Method


1. Preheat oven to 170C fan-forced.

2. Grease or line (baking paper) one large or two small slice tins or baking trays.

3. Place butter and sugar in a bowl and beat on medium with an electric beater until pale and fluffy. Add a dash of vanilla if desired and beat in.

4. Sift the two flours into the butter/sugar bowl and add a pinch of salt.

5. Mix together gently with a wooden spoon or using fingertips until the mixture resembles fine breadcrumbs.

6. Transfer to a lightly floured surface and knead gently to form a soft dough.

7. Wrap in cling wrap and refrigerate for 30 minutes.

8. There are two options at this point:

          a) Divide the dough in half and roll out one half on a lightly floured work surface to form a 20cm round. Carefully transfer to a prepared tray. Repeat for second round.

          b) Press the dough evenly into slice tin(s)

9. Using a sharp knife, score the surface of the dough into wedges or rectangles and prick the surface lightly with a fork and if making rounds, press the edges to form a fluted effect.

10. Lightly dust the shortbreads with the extra sugar.

11. Bake for 18-20 minutes, or until the shortbreads are light golden. Remove from the oven while still hot, follow the score marks and cut into wedges or triangles.

12. Cool in tray for 5 minutes then transfer to a wire rack.

It will keep, stored in an airtight container, for up to 1 week.
It can be made with plain flour alone; however, the addition of rice flour produces a lighter result.


Verdict
Turned out quite nice. Thick; next time I will use another pan or make the rounds. Nice crumbly texture - I'm not sure if it's too crumbly. Dad gave it the thumbs up though. Good flavour although I might add a touch more vanilla next time or even some maple syrup like in this recipe.

Will hopefully bake again early next week!

Tuesday, November 9, 2010

Caramel mud cake


Still procrastinating instead of studying for all my exams.

Made a caramel mud cake for my dad's birthday today! Had a tin of caramel top n fill in the pantry too so used some of that in the icing to make it extra caramelly.

I haven't made this cake before so was a little apprehensive about putting so much effort into the icing without knowing whether the actual cake turned out any good or not!

Used the taste.com.au recipe for the cake and the icing is from Joy the Baker

Caramel Mud Cake

Ingredients
200g butter, cubed
200g white chocolate, chopped (I used Dream)
200g (1 cup, firmly packed) dark brown sugar (I just used ordinary brown)
180ml (3/4 cup) hot water
1 tbsp golden syrup (I added about 1/2 a tbsp extra)
2 tsp vanilla essence
150g (1 cup) plain flour
150g (1 cup) self-raising flour


Method
1. Preheat oven to 160°C (140C fan-forced).


2. Line a round 22cm (base measurement) cake pan with baking paper.


3. Place butter, chocolate, sugar, water, golden syrup and vanilla essence in a heavy-based saucepan. 


4. Stir over medium-low heat with a wooden spoon for 5 mins or until chocolate melts and mixture is smooth. 


5. Set aside for 20 mins to cool.


Took nearly exactly 5 mins to melt


6. Add eggs, 1 at a time, whisking/beating well after each addition. 


7. Sift combined flours over chocolate mixture and stir with a wooden spoon until well combined.


I was worried about the lumpiness but didn't want to overmix (don't know if that's an issue with mud cakes or not though)

8. Pour mixture into pan and bake in preheated oven for 50-60 mins (mine took 60) or until a skewer comes out almost clean. 


9. Stand cake for 20 mins before turning onto a wire rack to cool.


It sank in the middle - lucky the icing can cover it!


Caramel Icing 


Ingredients
85g butter, softened
1 cup icing sugar
1/2 teaspoon vanilla essence
1/4 cup caramel (TopNFill or dulce de leche made from condensed milk)


Method
1. Beat butter and sugar together with an electric mixer on low until creamy.


2. Add vanilla and beat it in.


3. Add caramel and beat in until smooth, still on a low speed.


Was thicker than I expected!


4. Frost cake once it has cooled and drizzle with extra caramel and melted chocolate. Top with crushed nuts or toasted coconut, as desired. Fun!


Verdict


Oh my! The best cake I've ever made I must say, both looks and taste wise. Really quite mud-like and dense especially in the centre and the icing is divine. Family raved. This cake will be gone in no time.


Haha at the icing in the centre. It really did sink o.O How could I prevent that and make sure it cooks more evenly? Lower oven temp?


Next - post exam celebratory bake-up!


Monday, November 1, 2010

Choc chunk hummingbird muffins

I should be studying for exams. In my study break I wanted to exercise. So I walked to the shops. I bought some dark chocolate. Got home to find some over-ripe banana's screaming at me. So, naturally, I decided to make some hummingbird muffins with chunks of dark chocolate. This recipe includes nearly all of my favourite foods/flavours.

I based my muffins on the following recipe:


My version:

2 cups plain flour
1 cup self-raising flour
1 tsp bicarbonate of soda
1 tsp mixed spice (I just used a combo of cinnamon, nutmeg and ginger)
2 tbsp wheat germ
1 cup brown sugar
1/2 cup desiccated coconut
100g dark chocolate (chips or roughly chopped squares)
1 cup ripe, mashed banana
3 eggs, lightly beaten
1/2 cup olive oil (supposed to be 1 cup but I ran out)
1/2 cup pineapple juice (not supposed to be included)
250g crushed pineapple, drained
1 tsp vanilla essence


1. Preheat oven to 180C (160C fan-forced).

2. Line muffin tin with muffin papers or grease well.

3. Sift flours, bicarb soda and spices into a large bowl.

4. Stir in wheat germ, sugar, coconut and chocolate.


5. Combine mashed banana, whisked eggs, olive oil, pineapple (juice and fruit) and vanilla in a smaller bowl.


6. Add banana mix to flour mix and stir until combined.

7. Spoon into muffin papers up to the top.


8. Cook in the oven for 25 minutes or until cooked through and golden.

9. Let stand for 5 minutes then turn onto wire rack to cool completely.


Verdict
Really yummy! Very moist and heavenly when a mouthful contains a chunk of chocolate. Perfect study snack. Now back to studying I guess....


NEXT UP: Dad's birthday cake